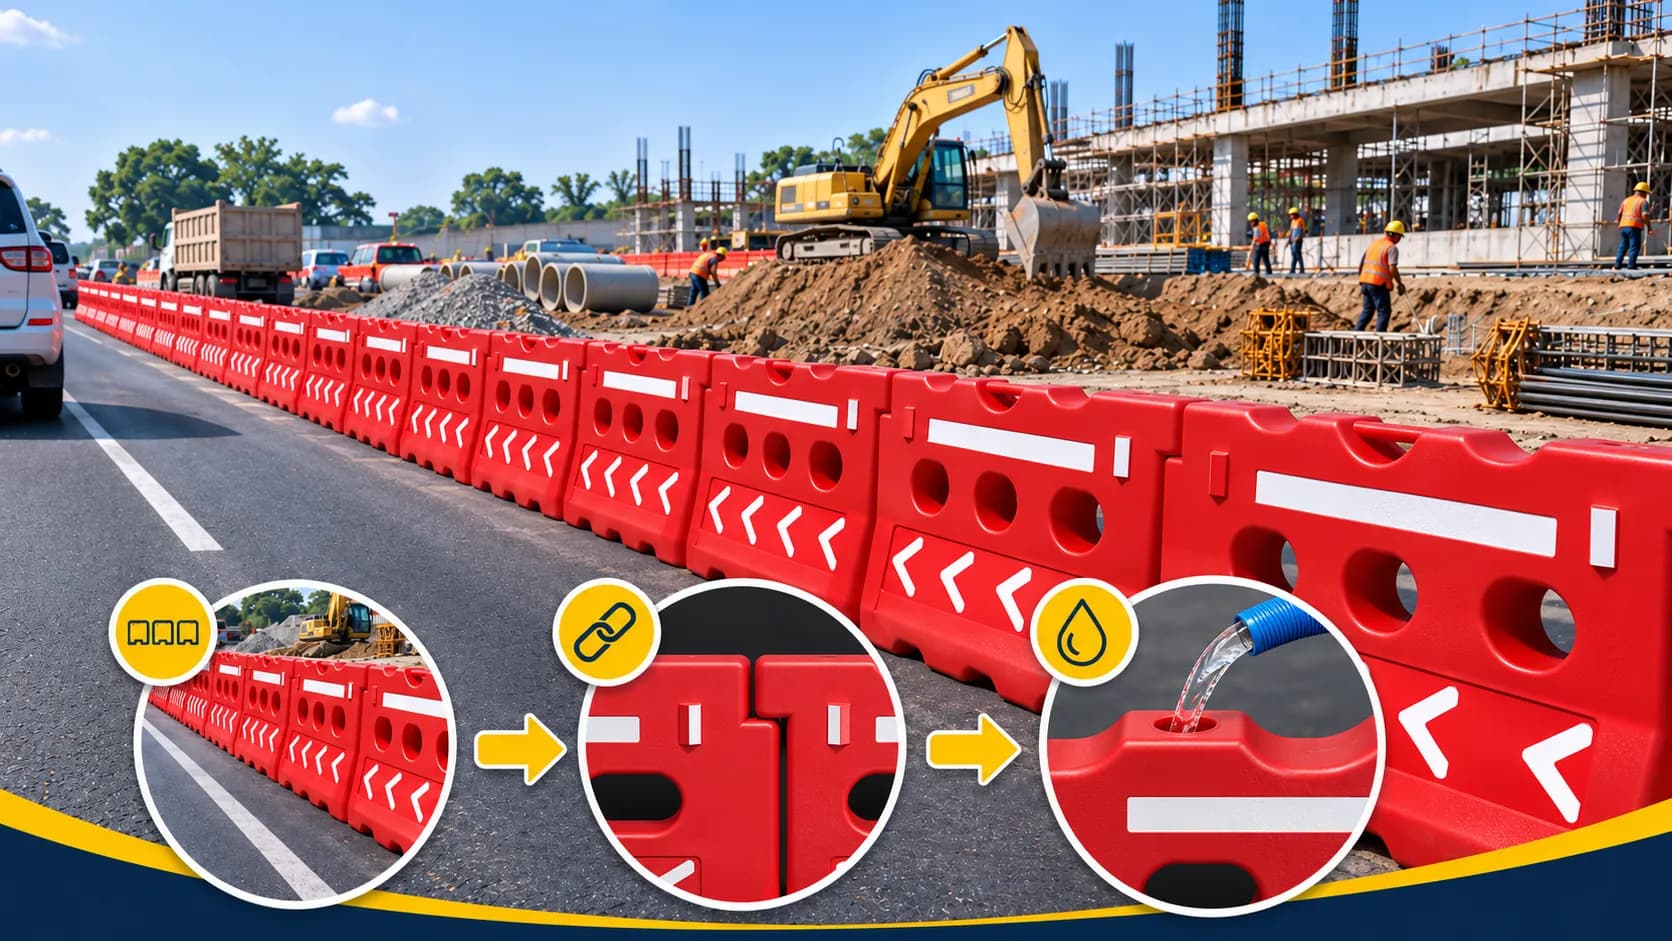
At construction sites, vehicle routes do not always remain the same from the beginning to the end of a project. Certain sections of a road may need to be closed, access for material delivery vehicles may be relocated, or specific work areas may need to be separated from operational routes.
For these purposes, water barriers are often used as temporary road dividers. They are relatively easy to handle because they can be moved while empty and filled with water once they have been placed in the required positions.
Although the installation process may seem simple, several details still need attention. Incorrect placement can interfere with vehicle movement, while improperly connected units can make the barrier arrangement difficult to manage.
So, how should water barriers be installed at construction sites? There are several steps to consider, from determining the installation area and connecting individual units to filling them with water and inspecting the completed arrangement.
Why Does Water Barrier Installation Need Planning?
A water barrier is a plastic barrier with a hollow body designed to hold water as ballast. It is a type of road barrier commonly used to help manage vehicle routes and separate construction work areas.
In road construction projects, barriers are generally installed to indicate which sections remain accessible to vehicles and which sections are being used for construction activities.
In industrial areas or warehouses, water barriers can also help separate operational vehicle routes from maintenance zones or other temporary activities.
However, their placement should always be adjusted to the conditions of each location.
For example, a project with a sufficiently wide vehicle route may be able to use a straight barrier arrangement. In areas with limited space, however, barrier placement must be carefully considered to avoid obstructing vehicles as they turn or maneuver.
It is also important to distinguish ordinary water barriers from road safety systems specifically designed to withstand vehicle impacts.
Not all plastic barriers are capable of containing vehicle collisions. Their selection must therefore consider traffic risks and the safety requirements of the project.
Preparation Before Installing Water Barriers
Before installation begins, several things should be checked.
Proper preparation can help reduce the need to move or rearrange the barriers after they have been filled with water.
1. Inspect the Installation Area
The first step is to examine the surface where the barriers will be placed.
Check whether the ground is reasonably level and stable. If there are holes, excessive slopes, or sections that cannot adequately support the units, the location should be evaluated before installation.
The available space for vehicles should also be considered.
The barriers should not make vehicle routes too narrow or obstruct the movement of construction equipment.
2. Determine the Length of the Area to Be Separated
Once the location has been identified, measure the length of the route that requires barriers.
This measurement will help estimate the number of water barrier units needed.
For example, if a project requires barriers along a route several dozen meters long, the number of units should not be estimated simply by looking at product photographs.
The dimensions of each unit and the connection design must also be considered, as the effective length of a connected arrangement may differ from the combined nominal lengths of the products.
3. Check the Barriers and Their Components
Before the units are transported to the installation area, make sure each barrier is in suitable condition for use.
Inspect the barrier body, filling openings, drainage outlets, and connection points.
If there is damage, leakage, or a connector that cannot function properly, the unit should be inspected or replaced before installation.
Prepare a water supply, filling hose, and any additional safety equipment required by the project.
For installations on roads that remain open to traffic, the work must follow the approved traffic management plan and instructions from the relevant authorities.
Positioning Water Barriers Along Construction Site Routes
Determining the correct position is one of the most important parts of installing water barriers.
The barriers should be placed according to vehicle movement patterns and work area requirements, rather than simply following the available space.
Installing Water Barriers Along Straight Routes
For straight sections, water barrier units can be arranged lengthwise along the planned boundary.
This arrangement is commonly used to separate vehicle routes from construction areas or temporarily restrict access to certain road sections.
Make sure each unit is properly aligned and does not suddenly extend into the vehicle path.
When barriers are placed along the edge of a work area, sufficient safety clearance should be provided according to the project's risk assessment.
Installing Water Barriers Along Angled Routes
In some projects, vehicles need to be gradually directed toward one side of the road.
In these situations, water barriers may be arranged along a planned diagonal alignment.
However, changes in direction should not be too abrupt. The layout must consider vehicle maneuvering space, visibility, and appropriate traffic warning devices.
The connection angle between units must also remain within the limitations of the product design.
What If the Route Has a Sharp Turn?
Not all water barriers can form sharp turns.
For models with modular connections, changes in direction are usually limited by the shape and movement range of their connectors.
Therefore, the connections should not be forced simply to follow the angle of the road.
If the project requires a sharp change in direction, the barrier arrangement may need to be redesigned, or a different system suitable for the location should be used.
Vehicle entry and exit points, pedestrian routes, drainage channels, and emergency access must also remain unobstructed.
How to Connect Water Barriers for Proper Alignment
Once the positions have been determined, the next step is to connect the water barrier units.
The connections allow individual barriers to form a continuous arrangement according to the product's design.
Modular road barriers generally have connecting hooks or connection points at their ends, allowing one unit to be joined to another.
The exact connection method depends on the model being used.
In general, the installation process involves the following steps:
Place the first unit at the starting point of the planned barrier route.
Position the next unit near the end of the first barrier, following the required installation direction.
Align the connecting hooks or connection points so the two units can be joined.
Connect the units according to the product instructions, including any connectors or locking components required by the model.
Inspect the connection and make sure both units follow the planned alignment.
Continue the installation until the entire barrier route has been formed.
It is generally better to arrange and connect the units while they are still empty.
This makes it easier to adjust their positions before the additional weight of the water is introduced.
If a connection does not fit properly, correct the problem before beginning the filling process.
Avoid using additional ties or connecting components that are not recommended by the manufacturer, particularly if they could alter the intended performance of the barrier system.

Filling Water Barriers: When and How Much Water to Use
After all the units have been arranged and their connections checked, the barriers can be filled with water.
Water acts as ballast, increasing the weight of each barrier and making it more stable than when empty.
Filling should generally be carried out after the barriers have been positioned according to the installation plan.
This is important because water-filled units are more difficult to move.
When Should Water Be Added?
A common installation sequence is to prepare the location, arrange the units, connect them, and then fill them with water.
Before filling begins, make sure the drainage outlet is properly closed.
Next, open the designated filling opening on the barrier body and add water using a hose or other suitable equipment.
The filling process should be monitored to identify any leaks or problems with the units.
How Much Water Is Required?
The amount of water depends on the product's capacity and the manufacturer's operating instructions.
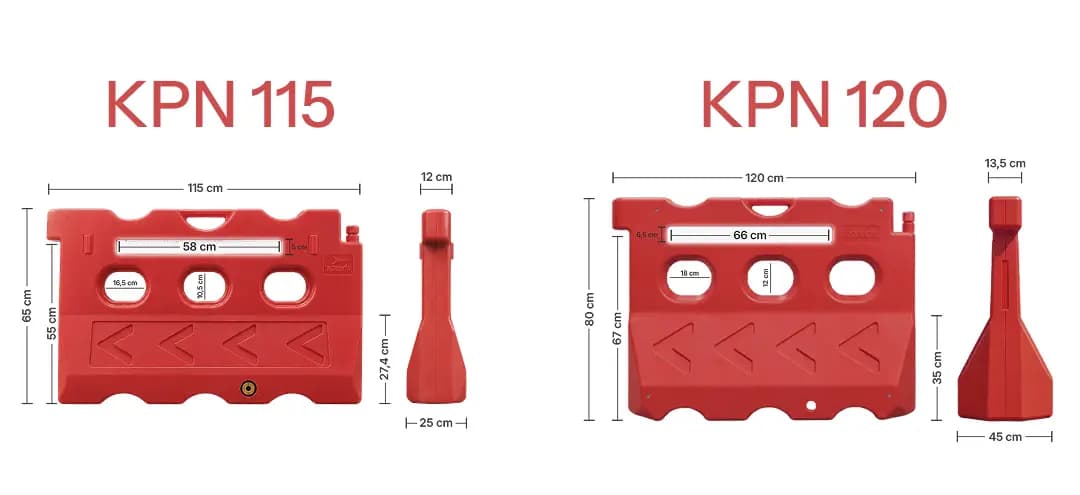
For example, Karpinus Road Barriers from PT Karya Pilar Nusantara are available in several sizes, including the KPN 115 model with a water capacity of 90 liters and the KPN 120 model with a water capacity of 140 liters.
These figures represent the nominal water capacity of each product. They do not necessarily mean that every installation requires the same filling level.
The appropriate water level should be determined according to the manufacturer's instructions and the technical requirements of the project.
Do not assume that a particular filling percentage applies to all types of water barriers.
Inspection After Filling
Once the required amount of water has been added, close the filling opening securely.
Check whether any water is leaking from the barrier body, filling cap, or drainage outlet.
Make sure the additional weight has not caused any change in position that affects the barrier arrangement.
If leakage is detected, the affected unit should be inspected and corrected before use.

Inspecting Water Barriers After Installation
Installation is not complete simply because all the barrier units have been placed in their intended positions.
A final inspection is necessary to ensure that the barrier arrangement follows the planned site layout.
Several things should be checked.
First, inspect the position of each unit. Make sure the water barriers follow the intended route and do not obstruct important access points.
Second, check the connections between units. Ensure that the connecting hooks or connectors are properly installed according to the product requirements.
Third, inspect the water filling. Confirm that the water level follows the relevant instructions and that no leaks are present.
Fourth, make sure the barriers are clearly visible. For road and vehicle-related applications, reflectors, signs, and additional warning devices should be provided according to site conditions.
Fifth, inspect the surrounding space. Vehicle routes, worker access, and other operational requirements must remain accessible.
Inspections should also continue during use, particularly after an impact, a change in the barrier arrangement, or weather conditions that could affect the barriers' position.
For use on public roads, the barriers should only become operational once the responsible authority has confirmed that the traffic arrangement meets the applicable requirements.
Common Water Barrier Installation Mistakes to Avoid
Several mistakes can affect the results of water barrier installation.
One common mistake is arranging the barriers without checking the space required for vehicle movement.
In restricted areas, a barrier arrangement may look neat but still leave insufficient maneuvering space for operational vehicles.
Another mistake is filling the units with water before their final positions have been determined.
Once the barriers have been weighted down, moving them requires additional handling. For this reason, the arrangement should be completed before filling begins.
Another issue to avoid is forcing the connections to accommodate changes in direction.
Water barriers are not always suitable for sharp turns. If the angle exceeds the product's intended range, the connections may not fit or function as designed.
It is also important not to assume that every road barrier divider is capable of withstanding a vehicle collision.
For work near high-speed traffic or locations with a significant risk of vehicle impact, a technical assessment and an appropriate protective barrier system are required.
By considering these factors, the installation can be planned more effectively without overlooking the safety requirements of the work area.
Choosing the Right Road Barrier for Your Project
Water barrier requirements can vary from one project to another.
These differences may depend on the length of the area being separated, available space, traffic conditions, and whether the units need to be relocated during the project.
PT Karya Pilar Nusantara supplies Karpinus Road Barriers made from High Density Polyethylene (HDPE), featuring a modular construction suitable for area separation applications.
The product range includes two models.
KPN 115 Road Barrier
The KPN 115 model measures 115 cm in length, 25 cm in width, and 65 cm in height, with a water capacity of 90 liters.
This model may be considered for applications requiring a more compact barrier unit, provided its dimensions and characteristics meet the project's requirements.
KPN 120 Road Barrier
The KPN 120 model measures 120 cm in length, 45 cm in width, and 80 cm in height, with a water capacity of 140 liters.
Its dimensions are larger than those of the KPN 115, which means its placement and water filling requirements are also different.
Both models are made from HDPE and designed for modular barrier applications.
The appropriate model should be selected after considering site conditions, the required number of units, and the intended function of the barriers.
With its own manufacturing operations, PT Karya Pilar Nusantara also serves road barrier procurement requirements for contractors, companies, and institutions that need products in specific quantities.
Further information about product specifications and available models can be found on the Karpinus HDPE Road Barrier product page.
Frequently Asked Questions About Water Barrier Installation
Do Water Barriers Need to Be Completely Filled with Water?
Not always. The required water level should follow the manufacturer's instructions and the conditions of the project.
The water capacity listed in the product specifications should not automatically be treated as the required filling level for every application.
Can Water Barriers Be Installed Around Curves?
Water barriers can follow certain changes in direction if their connection design and configuration allow it.
However, not all models are suitable for sharp turns. The installation angle must follow the product's limitations and the planned traffic arrangement.
Can Water Barriers Be Moved After Being Filled with Water?
Water barriers are easier to move when empty.
If the arrangement needs to be changed, the water should be drained according to the product's operating instructions and the project's safety procedures before the units are relocated.
Avoid dragging or lifting fully filled barriers unless the handling method is specifically permitted.
How Many Water Barriers Are Needed for a Construction Project?
The number of barriers depends on the length of the route, the dimensions of each unit, the connection design, and the required installation layout.
Before placing an order, it is advisable to prepare the area's measurements and an outline of the intended barrier arrangement so the quantity can be estimated more accurately.
Conclusion: Proper Installation Helps Manage Work Areas
Installing water barriers begins with identifying the area that needs to be separated.
Once the positions have been determined, the individual units can be arranged, connected, and filled with water according to the relevant operating instructions.
Inspecting the connections, unit condition, water levels, and available vehicle space is also an important part of the process before the barriers are put into use.
With proper planning, water barriers can help manage vehicle routes and temporarily separate work areas across different types of construction projects.
For contractors, companies, or institutions preparing to procure road barriers, PT Karya Pilar Nusantara offers a selection of Karpinus HDPE Road Barriers manufactured directly at its own factory.
To learn more about product specifications, available models, and quantity requirements, visit the PT Karya Pilar Nusantara Road Barrier page and discuss your project requirements with our team.