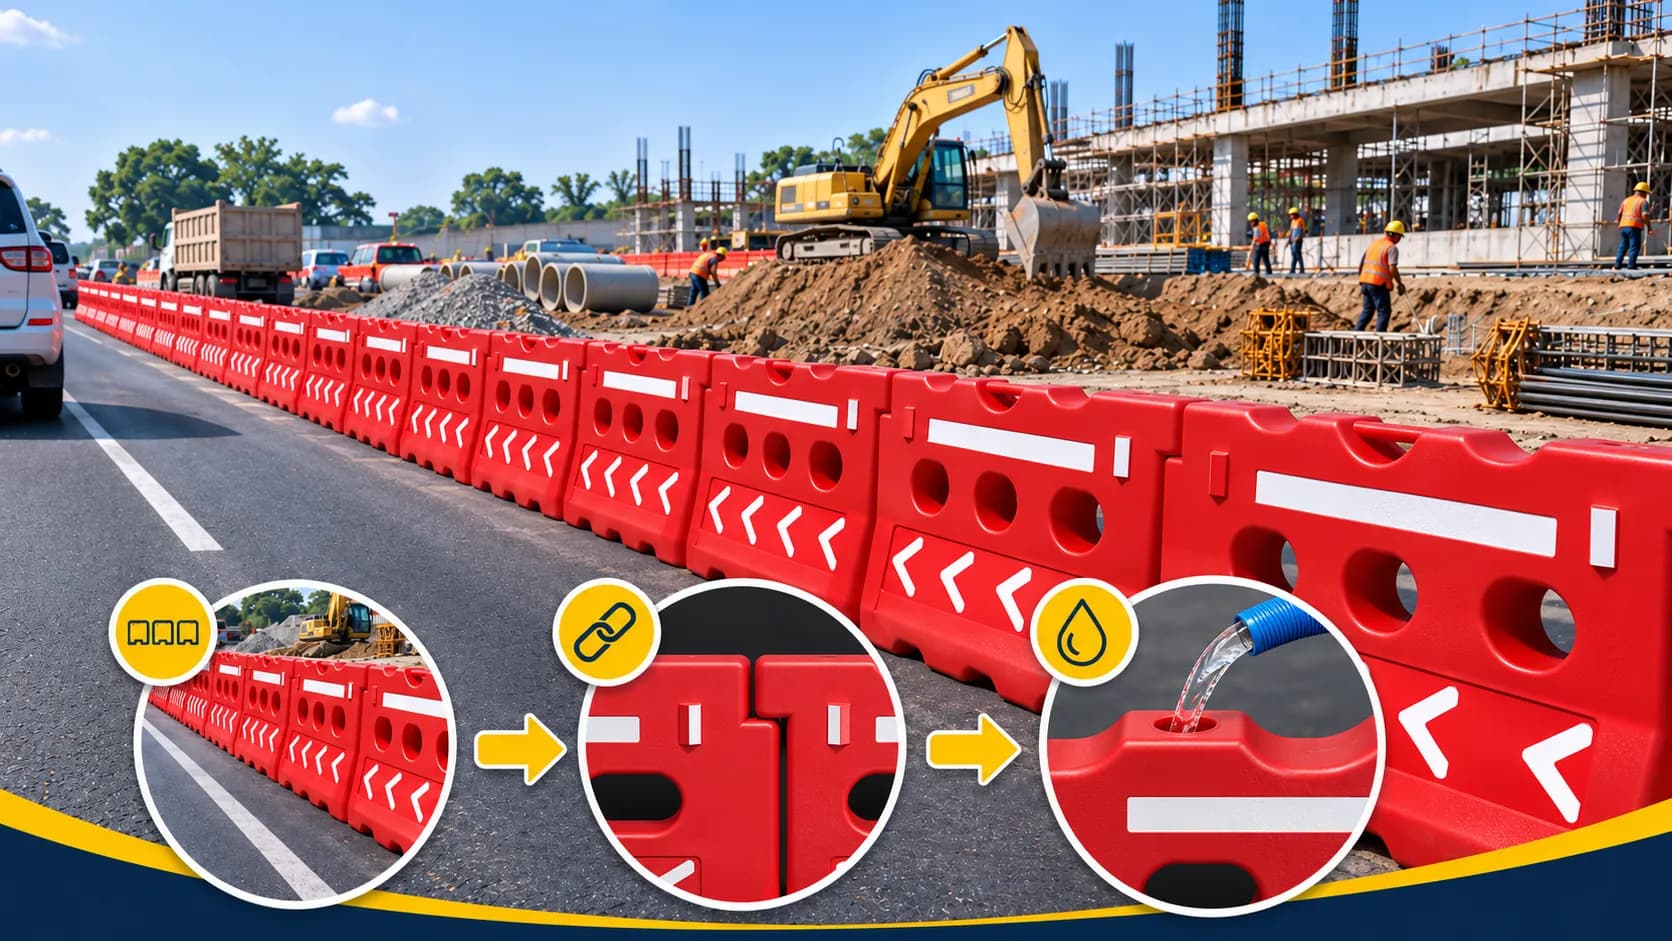
Installing water barriers at a project site involves more than simply arranging barriers along the road. Their placement, the connections between units, and the amount of water added all need to be considered to ensure the barriers function properly.
On construction sites, water barriers are commonly used to separate work areas from vehicle lanes, temporarily restrict access, or help direct traffic while work is underway.
These road barriers are relatively easy to move when empty. However, once filled with water, their weight increases, making them more difficult to reposition.
For this reason, installation should begin with planning the route, followed by arranging and connecting the units, and then filling them with water once their positions have been confirmed.
Here are several things to consider when installing water barriers at a project site.
Before Installation, Understand the Function of Water Barriers
A water barrier is a type of road barrier designed with a hollow interior that can be filled with water to add weight.
These products are commonly made from plastic materials such as High Density Polyethylene (HDPE). Their modular design allows several units to be arranged together according to the requirements of a particular area.
On construction sites, water barriers can be used to mark work zone boundaries, help guide vehicles, and restrict access to certain areas.
For example, when part of a road is being repaired, road barriers can be placed along the edge of the work area to help road users identify which lanes remain accessible.
However, it is important to distinguish between barriers used to guide traffic and safety systems specifically designed to withstand vehicle impacts.
Not all water barriers are capable of containing vehicle collisions. For work that requires protection against vehicle impacts, the type of barrier must meet the relevant safety requirements and testing standards.
Preparation Before Installing Water Barriers
Before installation begins, several things should be checked.
The first is the condition of the site. Consider the road width, lanes that will remain in use, project entry and exit points, and the location of work areas that need to be separated.
Second, inspect the physical condition of the water barriers. Make sure the bodies are free from cracks, the connecting parts are in good condition, and the water filling and drainage openings function properly.
This inspection is important because damage to the barrier body can cause leaks after the water has been added.
In addition, prepare the water supply before placing the units. Water may come from the supply network at the site or from a storage tank available for the project.
For installations involving a large number of water barriers, water requirements should be calculated in advance to prevent work from being interrupted after all the barriers have been positioned.
Work equipment, personal protective equipment, and temporary traffic management arrangements must also be prepared according to site conditions.
Determining Water Barrier Positions at Project Sites
Water barriers should be positioned according to the layout of the area and their intended purpose. Choosing the wrong route from the beginning may require the entire arrangement to be dismantled or moved again.
Installation Along Straight Sections
To separate a road or an elongated work area, water barriers can be arranged in a straight line following the designated boundary.
This arrangement is commonly used along construction areas, internal project roads, or boundaries between vehicle lanes and sections undergoing repairs.
Make sure the units are properly aligned. Pay attention to the surface conditions so that the bottom of each barrier has adequate support.
Avoid placing units on loose materials, unstable surfaces, or objects that could damage their undersides.
Installation Along Angled Sections
Not every project site has a straight road layout. In some situations, barriers need to be arranged at a slight angle to follow changes in the work area boundary.
Modular water barriers can be positioned with changes in direction as long as their connection systems can function as designed.
However, an angled arrangement does not mean that each unit can be turned to any angle.
At sharp bends, the connections between units may no longer align with their intended configuration. If the site requires a substantial change in direction, the arrangement and type of barrier should be reassessed.
Considering Vehicle Space and Project Access
In addition to the shape of the route, consider the space vehicles need to pass through.
Barrier placement should not suddenly narrow the road or obstruct access for operational vehicles.
In areas with intersections, entrances and exits, drainage channels, or emergency access routes, installation must follow the approved site management plan.
For work on public roads, the positioning and arrangement of water barriers must comply with traffic management plans and the requirements of the relevant authorities.

How to Connect Water Barriers Properly
Once the positions have been determined, the next step is to connect the water barrier units.
Some road barrier models have hooks or connecting holes that allow several units to be installed in sequence.
These connections are intended to form an orderly barrier arrangement and maintain the connection between units according to the designed system.
During installation, place the first unit at the designated starting point. Then bring the next unit closer until the connecting parts are correctly aligned.
If the model uses separate pins or connectors, install these components according to the product instructions.
Check that the connectors are properly installed and that none of the connecting parts are damaged.
One thing to avoid is assuming that two units placed next to each other automatically form a connected barrier system.
The same applies to additional fastening materials that are not part of the intended design. Do not replace connection components with improvised materials without technical approval.
Why should connections be checked before filling the barriers with water?
When the barriers are empty, their positions are relatively easy to adjust. Once water has been added, however, each unit becomes heavier, making it more difficult to align the connections.
For this reason, make sure the arrangement and connectors are properly positioned before proceeding with water filling.

How to Fill Water Barriers After Installation
One advantage of water barriers is that their weight can be increased by adding water after they have been placed at the site.
When empty, the units are relatively light and easier to transport and arrange. Once filled, the additional water mass helps improve stability compared with their empty condition.
However, filling must still follow the capacity and operating instructions for each model.
Make Sure the Positions Are Correct
Before filling the barriers, check the entire arrangement from beginning to end.
Make sure no units are tilted, displaced from the installation line, or connected incorrectly.
If any adjustments are still needed, it is better to make them before the units are filled with water.
Prepare a Hose or Water Source
Water can be added through the filling opening provided on each unit.
Use a hose or filling equipment that fits the opening. Make sure the water flow can be controlled to prevent excessive overflow during filling.
For projects involving a large number of water barriers, the water supply and storage capacity should be calculated based on the number of units and the required filling volume.
Fill with Water According to Product Specifications
The amount of water required is not always the same for every water barrier model.
For example, the KPN 115 Road Barrier from PT Karya Pilar Nusantara has a nominal water capacity of 90 liters, while the KPN 120 model has a nominal capacity of 140 liters.
This difference shows why water requirements must be adjusted according to the model being used.
Nominal capacity should not automatically be interpreted as a requirement to fill the entire interior without referring to the manufacturer's filling instructions.
During filling, inspect the condition of the barrier body and make sure there are no leaks.
Check the Caps and Drainage Openings
After filling is complete, make sure the filling opening is closed according to the product design.
Also check the water drainage opening at the bottom, if one is provided.
The drainage opening must be properly closed to prevent water from escaping during use.
Inspect several units, especially those that have recently been connected or have been used before.

Final Inspection Before Using the Barriers
Once all the units have been arranged and filled with water, the installation should not immediately be considered complete.
Several final inspections are necessary to ensure the arrangement meets the requirements of the site.
Barrier positions and arrangement. Check whether all units still follow the planned installation line. Make sure no barriers have moved during the filling process.
Condition of connections between units. Make sure each connector has been installed according to the instructions and that no parts have come loose.
Water and barrier body condition. Look for signs of seepage or leaks around the bottom, body joints, and drainage openings.
Barrier visibility. Make sure the barriers are clearly visible to road users. In certain conditions, traffic signs, warning lights, and reflectors may be required according to the traffic management plan.
For nighttime use, reflectors can help make barriers visible when illuminated by vehicle headlights. However, reflectors are not a substitute for warning devices required at the site.
Inspections should also be carried out regularly throughout the project, especially after route changes, disturbances to the barrier arrangement, or work that may affect barrier positions.
Common Mistakes During Installation
Although installing water barriers may seem simple, several mistakes can prevent them from functioning as intended.
The first mistake is filling the barriers with water before confirming their positions. As a result, barriers that have already become heavy may need to be emptied or handled again when the arrangement needs to be changed.
Another mistake is arranging the units without checking their connections. Two barriers placed close together are not necessarily connected if their connecting systems have not been properly installed.
Another common mistake is ignoring surface conditions. Uneven or slippery roads, as well as surfaces covered with loose materials, need to be inspected because they can affect barrier positioning and stability.
Some installations also force the barriers to follow unsuitable route shapes. Modular water barriers can be arranged in certain configurations, but not all models are suitable for sharp bends.
Finally, do not assume that water barriers automatically become capable of containing vehicle collisions once they have been filled with water.
Barriers designed to mark boundaries and guide traffic have different capabilities from impact protection systems that have been specifically designed and tested.
In areas with a high risk of collisions, project managers must determine the appropriate type of protection through a safety assessment.
What If the Water Barriers Need to Be Repositioned?
During construction work, barrier positions sometimes need to be adjusted as the project progresses.
For example, a work area that was previously located on the left side of the road may move to the opposite side after the first stage of work has been completed.
In such situations, water barriers can be rearranged by following the appropriate moving procedures.
Before moving the barriers, make sure the area has been secured and that vehicles cannot enter the relocation work zone.
If the units are still filled with water, drain them first according to the product handling instructions. Avoid moving or dragging heavy, filled units without suitable methods and equipment.
Water can be released through the available drainage openings. Make sure the discharge does not endanger road users or interfere with the surrounding environment.
Once empty, the units can be inspected, moved, and rearranged according to the new layout.
Before using them again, check the condition of the bodies, connections, filling openings, and drainage outlets. Any damaged units should be repaired or otherwise addressed before being reinstalled.
HDPE Road Barrier Options for Project Requirements
Choosing a water barrier model should take into account site conditions, the length of the area to be separated, and operational requirements.
PT Karya Pilar Nusantara supplies HDPE road barriers for work zone separation, vehicle route management, and other operational activities.
Available models include the KPN 115 and KPN 120 Road Barriers.
The KPN 115 Road Barrier measures 115 cm in length, 25 cm in width, and 65 cm in height, with a nominal water capacity of 90 liters.
Meanwhile, the KPN 120 Road Barrier measures 120 cm in length, 45 cm in width, and 80 cm in height, with a nominal water capacity of 140 liters.
Both models use a modular barrier design, allowing them to be arranged according to the intended use and the characteristics of each product.
Differences in dimensions and water capacity should be considered during the planning stage, especially when a project requires a large number of barriers.
As a company that manufactures HDPE road barriers, PT Karya Pilar Nusantara also serves procurement requirements for contractors, industrial companies, government institutions, and distributors.
Information about specifications and available models can be found on the PT Karya Pilar Nusantara HDPE Road Barrier product page.
Frequently Asked Questions About Water Barrier Installation
Should water barriers be filled with water before installation?
Hollow water barriers are generally easier to arrange when empty. Water is added after the units have been positioned and connected according to the plan. For operational use, follow the filling instructions and site safety requirements.
Can water barriers be installed at an angle?
Yes, provided that the shape and connection system of the model allow such changes in direction. Avoid forcing sharp bends that cause the connections to move outside their intended configuration.
How many liters of water does one water barrier need?
Water requirements depend on the model and filling instructions. For example, the KPN 115 has a nominal capacity of 90 liters, while the KPN 120 has a nominal capacity of 140 liters. The actual filling volume during use must follow the product instructions and project requirements.
Do all water barriers need to be connected?
For installations designed as a continuous arrangement, the connection system should be used according to the product instructions. Placing units separately should only be done when it is consistent with the approved barrier layout and intended function.
Can water barriers be reused after a project is completed?
Water barriers can be reused as long as their physical condition remains suitable. Before moving or storing them, drain the water according to the instructions, clean the units, and inspect the connections and caps.
Conclusion: Proper Installation Begins with Correct Positioning
Installing water barriers at project sites requires attention to three main factors: positioning, connections between units, and water filling.
Planning the positions from the beginning makes it easier to arrange the barriers according to the work area. Properly installed connections help form a barrier arrangement according to the product system, while adding water increases the weight of each unit and helps improve stability compared with its empty condition.
The condition of the units, road surfaces, reflectors, and supporting equipment should not be overlooked.
With proper installation, water barriers can help establish clear work area boundaries and support vehicle route management throughout a project.
For HDPE road barriers in small quantities or for project procurement, product information and available models can be obtained through PT Karya Pilar Nusantara.


